
~The Sim Site Resource Center~
Skin Tutorial
Section 1: What You'll Need
With any project you start you need to be prepared. In order to create skins
for The Sims you need the following items: 1. Go to The Sims.com and download
Sim show2. You will need an image-editing program such as Adobe Photoshop,
Adobe Illustrator, PaintShop Pro, Kai's Photo Soap, PhotoImpact, PhotoDeluxe,
PhotoMax Image Maker, MicroFrontier Color It, PhotoSuite, PhotoVista, Picture
It, or Ulead Photo Express. To find one of these programs for downloading, go
to www.yahoo.com or any other Internet search engine and type in the program
name you want to try out. Go to the company website for the program and see
if they have a trial download available.
Section 2: Understanding SimShow
It is very important to first open up SimShow and get familiar with the way
the program works. When you first open it you will see various windows and
buttons. See the illustration below to learn what they are for and do.
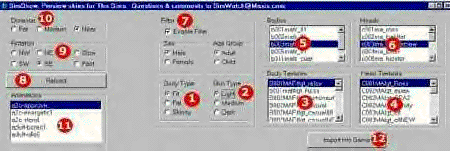
1- The Shape of your Sim
2- The Tone of your Sims Skin
3- Where your actual Skin files are!
4- Where your actual face files are!
5- The Body shapes for your Sim such as pants, skirts etc.
6- The Head shapes for your Sim
7- If you uncheck this box, it will turn the filter off. The filter is what
keeps all the files in the correct categories.
8- Press this button to refresh your SimShow files.
9- This will help you to see all sides and angles of your Sim body.
10- How close or far away you can view the Sim body
11- This is the movement you can make the Sim body do for previewing.
12- Press this button when your new Skin and face is ready to be installed
into the game!
Before going any further, please go through the skins in SimShow, get
familiar with the different Mesh's, skin tones and clothing styles. Keep
SimShow open whenever you are working on your skins, you can more easily
check your work this way.
Section 3: The Importance of Skin File Names and How to Read Them
You must save your skin files with the correct file name or your game will
not recognize them. If you take a peek in the SimShow/GameData/Textures/
folder you will see all the skin files with names such as
B001FCChdlgt_girl02.bmp or B003MAFitlgt_Dad01.bmp. Every body skin file name
begins with a B followed by a few numbers. Those numbers should match the
numbers in the body shape file.FA is FemaleMA is MaleFCChd is Female
ChildMCChd is Male ChildSkn is SkinnyFit is FitFat is Fatmed is Mediumlgt is
Lightdrk is Dark Examples: B002FAFatlgt_gma1.bmp is a Female/Fat/Light
skin.B002MCChdlgt_slob.bmp is a Male Child/Light skin.
Section 4: Creating a New Skin File
To begin, I recommend working from an existing skin file that you have in
SimShow. Go to your Simshow/Gamedata/Textures folder and select a skin to
work with. Open it up in your Image Editing Program and SELECT ALL of the
.bmp. You then want to COPY the skin image and then select NEW. The new file
should be 256 X 256 in size. All body skin files are this size. When you have
a new file open, PASTE into it. That will be the file you can work with. Make
sure that the file is in RGB Mode. That is the mode to have it in when
editing. For Adobe users: On the Top Menu Bar, select IMAGE, then select
MODE. Change it to RGB if it is not already.
Section 5: How the Skin Fits on the Body
When creating clothing for your Sims you need to know how the skin will fit
on the body so that everything lines up correctly. See the image below!
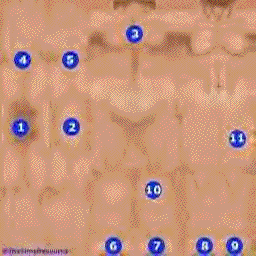
1- Armpit
2- Top of Shoulder
3- Back
4- Underside of Arm
5- Top of Arm
6- Left Heel
7- Right Heel
8- Left Toes
9- Right Toes
10- Leg Calves
11- Front Thighs
I got a lot of help from thesimsresource on this one.
I needed the pictures for it etc.
~Rage~